Site Configuration
Site Configuration lets you customize and set up many of the features in Destiny.
As a Destiny Administrator, you can apply the settings to new sites only, and/or push many of the settings to a single site, a site type, or the whole district.
Because these pages contain all the settings available in Destiny, the options indicate the product – Library Manager, Resource Manager, and Textbook Manager – to which they apply.
To set up Site Configurations options:
- Log in as the Destiny Administrator.
- Select Setup > District Options sub-tab.
- Click Edit next to Site Configuration Settings.
- Click either the Catalog or Circulation sub-tab.
- Next to the option you want to edit, click
 .
.
Catalog Options
You can make selections to alter or enhance the appearance and function of options in the Catalog and for a library inventory.
- Reading Program Searches (Library Manager):
If your libraries use Reading Counts!®, Accelerated Reader™, Lexile®, or Fountas and Pinnell, you can let library patrons limit their searches to books in one or more reading programs. - Library Title Display Settings (Library Manager):
Select the order of information on the Title Details page, include a reviewer's name in library reviews, and set the Visual Search results display format. - Supported Search Languages (Library Manager ):
In addition to English, you can let patrons view the Catalog in French, Spanish, or both, and set the default display language. - Library Inventory Options (Library Manager):
Set how Destiny should check shelf order and discover incorrectly shelved Dewey range titles during Inventory. - Miscellaneous Settings (Library Manager):
Configure various options related to available search limiters and how search results display; set whether to remove titles from the collection when all copies are deleted; enter how long search statistics are stored in Destiny; and add or edit your library sublocations.
After making selections for a Catalog option, you can apply the settings for new sites or push to existing sites.
- To apply the settings to new sites, click Save.
- To push to an existing site, from the Apply these settings at drop-down, select the site or site type from the list, and then click Push.
Circulation Options
You can set up several circulation limits and policies, define barcode symbologies, and change sounds produced during circulation transactions.
- Loan Policies:
Decide whether library materials or resources can be circulated throughout the district; set default check-in settings; and determine how library loan periods will be calculated; as well as how and what textbooks and resources (including consumables and unbarcoded) can be checked out, and if duplicate resources can be checked out by a patron.
Note: If your district has enabled district-defined ILLs, date calculation for days to ship and days to circulate is controlled at the district level. The loan policy at the district overrides the site loan policy. - Fine Policies:
Choose to automatically calculate fines for lost or overdue library, textbook, and resource items. You can require library and resource staff to enter explanatory notes when waiving fines. In Resource Manager, you can have Destiny automatically delete any fines owed for resources being deleted.
- Hold/Reserve Policies (Library Manager):
Set the number of days required to prepare ready reserves, determine the number of days after which expired holds are automatically deleted, and select the default delivery method for interlibrary loans (ILL).Note: Hold/Reserves policies are only applied to new sites. You cannot push the settings.
- Preferred Barcode Symbologies:
Define the default barcode symbology settings for new sites. The supported symbologies are Follett Classic, Generic Code 39, Code 39 mod 10, and Code 39 mod 43.
Note: Barcode symbologies are only applied to new sites. You cannot push the settings.
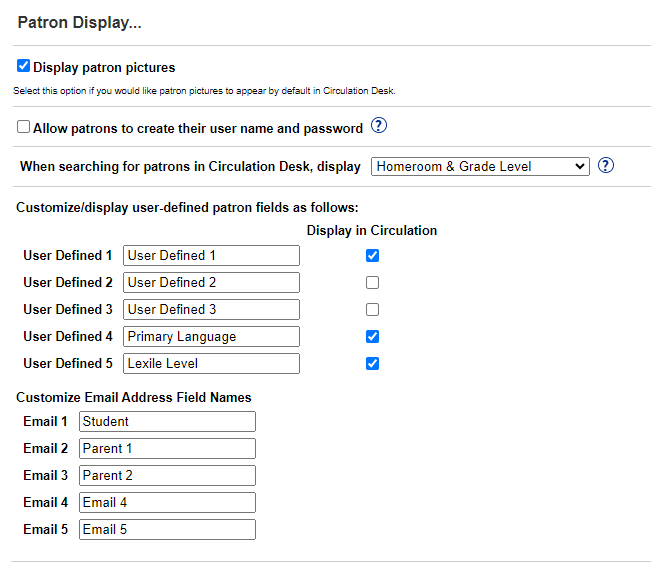
- Patron Display:
Decide what information will display during circulation (including patron pictures), and if patrons can create their own username and password. Customize user-defined and email fields.
- Circulation Sounds:
Change the default sound files that are played when certain events occur during circulation.
After making selections for a Circulation option, you can apply the settings for new sites or push to existing sites.
- To apply the settings to new sites, click Save.
- To push to an existing site, from the Apply these settings at drop-down, select the site or site type from the list, and then click Push.
Impacts and Considerations
While the Destiny Administrator can change site configuration settings and push down to sites, most Library Administrators set site configuration settings at their campuses, particularly for library materials.
If the Destiny Administrator changes these settings and pushes them down, it will alter all site-level configurations. This means, if an option is not selected at the site and the Destiny Administrator selects it at the district level and pushes it down, the option is now selected. The site will need to deselect it at their site.